Here are the some simple steps to configure outlook account in Outlook 2010
STEP1–>Click Start –> Control Panel–> Mail

STEP2–>Click add Button
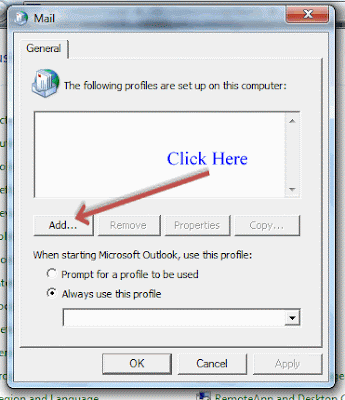
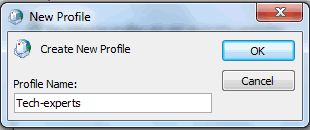
STEP3–>Enter the Profile Name(any name that you want for that profile) as Shown Below.
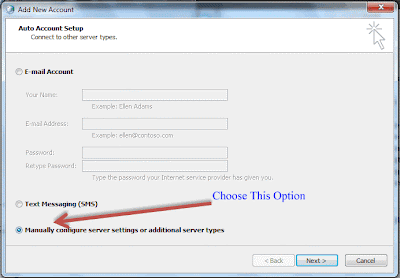
STEP4–>Choose Manually Configure Server Settings and click next.
STEP5–> Choose Service type Such as POP, IMAP, Microsoft Exchange etc. which is provided by your mail server
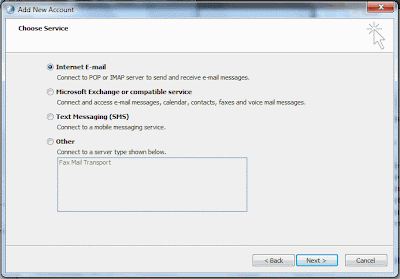
STEP6–>Enter the details as shown Below and click next to continue.
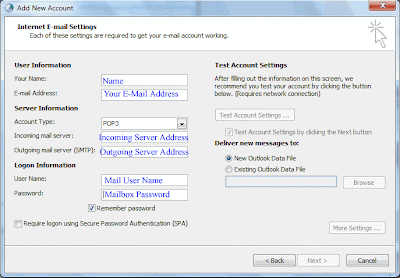
outgoing mail server address and incoming mail server address is provided by the mail service provider.e.g for yahoo server addresses are:
Incoming Mail Server:plus.pop.mail.yahoo.com (Use SSL, port: 995)
Outgoing Mail Server:plus.smtp.mail.yahoo.com (Use SSL, port: 465, use authentication)
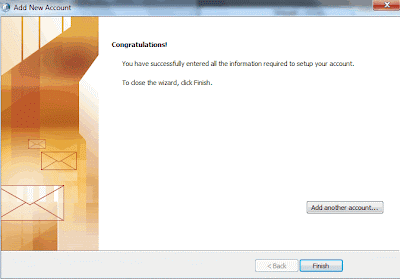
Click finish to Complete Setup.
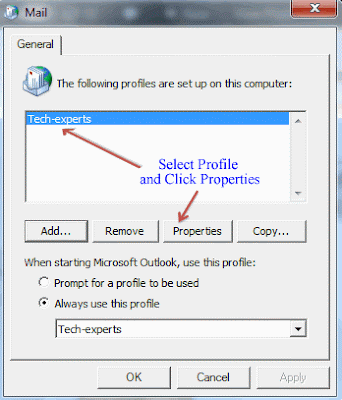
STEP7–>Select Profile and Click to Properties
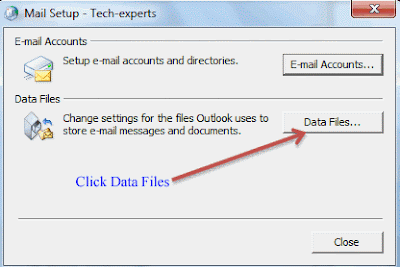
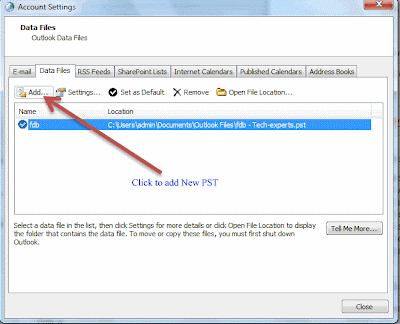
STEP8–>Click Data Files
STEP9–>Click add to add new PST File.
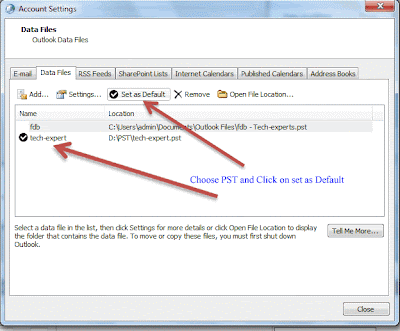
STEP10–> Choose PST and Click on set as default. Now this PST will be used as default PST of your account. and Then Click Close
Close all pop up windows.Your outlook Account is Now Configured
STEP1–>Click Start –> Control Panel–> Mail

STEP2–>Click add Button

STEP3–>Enter the Profile Name(any name that you want for that profile) as Shown Below.

STEP4–>Choose Manually Configure Server Settings and click next.

STEP5–> Choose Service type Such as POP, IMAP, Microsoft Exchange etc. which is provided by your mail server

STEP6–>Enter the details as shown Below and click next to continue.

outgoing mail server address and incoming mail server address is provided by the mail service provider.e.g for yahoo server addresses are:
Incoming Mail Server:plus.pop.mail.yahoo.com (Use SSL, port: 995)
Outgoing Mail Server:plus.smtp.mail.yahoo.com (Use SSL, port: 465, use authentication)
Click finish to Complete Setup.

STEP7–>Select Profile and Click to Properties

STEP8–>Click Data Files

STEP9–>Click add to add new PST File.

STEP10–> Choose PST and Click on set as default. Now this PST will be used as default PST of your account. and Then Click Close

Close all pop up windows.Your outlook Account is Now Configured
No comments:
Post a Comment